The audio system is a very important part of the home theater. In addition to good visual effects, sound surround and accurate sound image positioning are the most important. Therefore, how to install and configure the home theater audio system becomes more important. In the process of setting up a home theater, after choosing a speaker that suits you, the next task is to set up, install and debug the speaker. Because the home theater system has a strict set of specifications for speaker installation, placement, and debugging, this means that users only need to follow these specifications to install and debug the speakers to get the desired sound. We have previously mentioned some related installation steps and debugging methods for home theater speakers, but they may only be explained for a particular environment and may not be suitable for other home environments. Therefore, in this special issue of "How to do after buying a home theater", including the previous: "Buy the second step of audio: home theater wiring and speaker placement", we will focus on the general family environment Installation and commissioning - introduction, I hope to give consumers a guide.
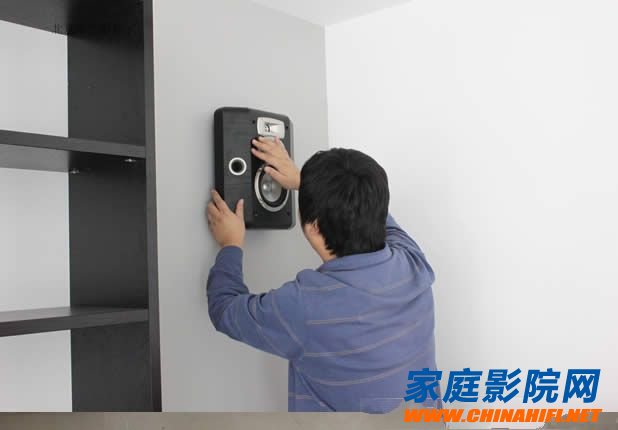
Front channel speaker installation
The front channel consists of two main speakers and one center speaker, referred to as the LCR channel. These three speakers are responsible for most of the sound in the software. Therefore, it is very important to install. According to the THX example, the best way to install an LCR speaker is to mount the three speakers at the same height and level with the ears when the listener is sitting, in order to get the best sound field and the correct vocal dialogue. . However, this condition is not necessarily true for the home environment of most consumers. For example, consumers who do not use a sound-transparent screen or use a television set cannot install it as described above. For this part of the consumer, you can try to install the center speaker on the top or bottom edge of the display device, and then adjust the radiation direction of the speaker. However, this approach must be noted that the installation height of the center speaker and the angle between the L and the channel-only speakers cannot be dried up to 10 degrees, so as not to damage the sound image positioning and sound field of the vocal dialogue.
In addition to the above installation methods, the user can also try to install the LCR channel speakers simultaneously on the upper or lower edge of the display device. Then, make the same adjustment to the radiation direction of the three speakers, so that you can also get an ideal front sound field.
Surround speaker installation
The surround speakers currently on the market include dipole radiant speakers and traditional direct radiant speakers. For the current 7.1-channel AV system, you need to use 4 surround speakers. In one case, you can configure 4 dipole radiant speakers or 4 direct radiant speakers, or use dipole speakers for the side channels and direct radiant speakers for the rear channels. These speakers also have some specific requirements when installed. For example, a direct-radiation speaker, like the front LCR channel, directs the direction of radiation to the listening position. For a dipole speaker, the “zero zone†of the speaker needs to be pointed to the listening position. In terms of the installation height of the speaker, according to the THX example, the installation height is about 1.8m-2.2m, then the consumer needs to use the speaker bracket to fix the speaker on the wall. Therefore, consumers can go to the store where the electric appliance market sells racks to buy some suitable speaker brackets to install the speakers. If you can't find a suitable bracket, consider making one according to your own speakers, but the cost will be relatively high. However, some speaker manufacturers will introduce corresponding speaker brackets according to their products when they are producing speakers, so that consumers can purchase them. For example, professional manufacturers such as M&K and Genelec have corresponding speaker accessories.
Subwoofer settings and placement
The subwoofer is mainly used to make up for the low frequency limit of the main speaker. At the same time, it can also increase the low frequency energy. Therefore, consumers must set the low frequency crossover point of the AV amplifier before using it. When setting the crossover point, it should be set according to the speaker you selected. For example, if you have selected a THX-certified home theater speaker such as M&K or Atlanta, you can set the crossover point to 80Hz. For other speakers, you must set the crossover point for each channel based on the low frequency response of each speaker. Once the crossover point is set, the subwoofer can be placed. So which position is better for the subwoofer in the room? Since the low frequency below 80Hz is almost non-directional, in theory, the subwoofer can be placed anywhere in the room. But in reality, consumers need to try to place the subwoofer in different positions in the room to try to find the best placement point. In general, consumers can place the subwoofer in front.
General commissioning of the speaker system
Finally talk about the overall debugging of the speaker system. First measure the distance between each speaker and the human ear (generally the distance between the tweeter and the human ear), and input the measured distance value into the AV amplifier. Then, the consumer uses the sound pressure meter to measure the output sound pressure of each channel at the listening position, and independently adjusts the output level of each channel in the AV amplifier according to the reading, so that the sound pressure of each channel is reached. 80dB reference sound pressure value. Then the speaker settings are basically completed.
After completing the above two steps, in fact, for the ordinary consumers of the big points, it is already completed the basic debugging. But for some consumers who are looking for better results, it is recommended to use an equalizer to correct the room's frequency response curve. Why is it so open? The main reason is that the frequency response curve of the listening environment of most consumers is not ideal. Of course, some people think that adding an equalizer will affect the sound quality. However, if the frequency response curve of the room is not ideal, it will seriously affect the overall sound balance, and finally the overall sound effect will be worse. Therefore, the use of an equalizer is a good choice when the listening environment is relatively unsatisfactory.
Before using the equalizer, the first condition is to understand the frequency response curve of your room. At this time, you can find a friend who is engaged in acoustic measurement to help you measure the frequency response curve of the room. Then, according to the room frequency response curve, the corresponding attenuation or gain is made on the equalizer. However, it should be noted that the equalizer should not be excessively trimmed. This is because adjusting the gain of the corresponding frequency band in the equalizer actually increases the output level of a certain frequency. If a certain frequency is adjusted too much, the amplifier will cause the level of the amplifier to be too large. Burned out, so be careful when adjusting.
The basic installation and setup of the home theater speakers have been roughly described. However, it is also worth noting that consumers must use their familiar software and constantly adjust the speaker system through their actual sense of hearing, in order to get the desired results.
Next, we want to introduce how to set up and debug the power amplifier: "Buy the sound of the fourth step: home theater amplifier settings"
Best Battery Pack,Dewalt Battery Pack,Plug In Battery Pack,Dash Cam Battery Pack
Zhejiang Xinghai Energy Technology Co.,Ltd , https://www.headwayli-battery.com