Before starting the matching process, double-check that the connection cable is correctly installed and properly connected to the system.
Once the cable is confirmed, proceed with the matching procedure.
First, during the boot-up process, press and hold the previous page button while the system starts. This step ensures the device enters the correct mode for configuration.

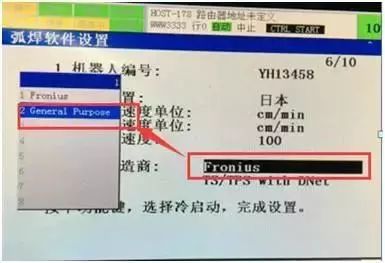
Next, wait for approximately 15 seconds until the interface appears. From the menu, navigate to "Select" and then enter the number 3 to access the settings.

After 15 seconds, the system should display a new screen. Set the manufacturer option from "Ceneral Purpose" to "Fronius." In some cases, it might already be set to Fronius, so you may need to switch it back after making changes.
Then, configure the type setting to "TS/TPS with Dnet." Make sure the system performs a cold boot before proceeding with the normal startup.
During the cold boot, press the FCTN function key to initiate the setup process.
After the system boots up, you will see a new interface. Enter the Device MAC ID by inputting "2" twice. Then, choose "Reset IO" and select "No" to avoid any unnecessary resets.
Next, ensure the DevioceNet board is in the ON state. This is crucial for proper communication between the system and the welding equipment.
Proceed to set up the arc welding software. Enable multiple welding condition processing to allow flexibility during the welding process.
Configure the digital output signals as follows:
(DO121) Typically used for "Start Welding"
(DO122) Usually assigned to "Reverse Robot Ready"
Once all settings are complete, use the teach pendant to confirm the wire feeding process. If everything is working correctly, the wire should match successfully and display an "OK" status.
After completing the match, you may encounter some common issues:
1. The alarm message: "(ARC-025 is activated after welding)"
This typically occurs after the welding process. To resolve this, go to the variable settings and adjust "AWEPCR—AWEPCR—T—AE-CHK—DI" to "FALSE."
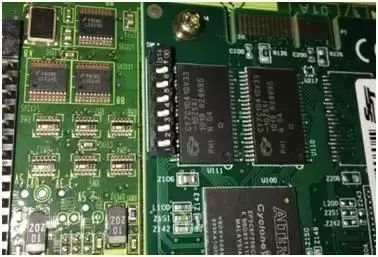
2. The motherboard is not detected.
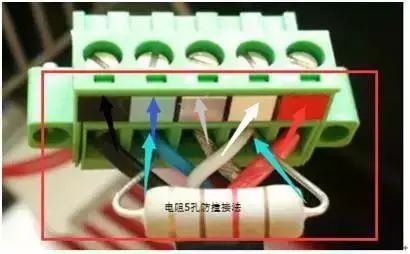
Check the DevioceNet plug wiring. The cable should be connected in the following order from top to bottom: red, white, silver, blue, black.
For the five-hole anti-collision method, connect a 120Ω resistor between the white and blue wires.
The motherboard should look like the image shown. Ensure the DevioceNet cable is properly connected to the correct ports.
Pet Self Wrap Braided Sleeve,Braided Pet Sleeve,Expanding Cable Sleeve,Colored Cable Sleeves
Shenzhen Huiyunhai Tech.Co., Ltd. , https://www.cablesleevefactory.com